


Dutch Toolchest
A place for everything and everything in its place

In Santa Monica we took the pandemic pretty seriously (maybe too seriously.) School was done entirely from home starting March 12, 2020. A couple months later I was about to start a meeting (working from home, of course,) but I could hear that Axel (5, then,) was awake, so I went to get him up from nap.
We would have Roman sleep in the boys’ bedroom for nap, Axel sleep in our bedroom for nap, and Catherine would sleep in the living room (where my office was, along with me and my noisy keyboard.) Our bedroom had sliding doors to the closet, but we used spring clamps against the top of the door to keep Axel from messing with our stuff.
He had already gotten strong enough to force the door open. Usually Cat would catch him playing with my guitar. That sorta announces itself, you know? This day something else happened…
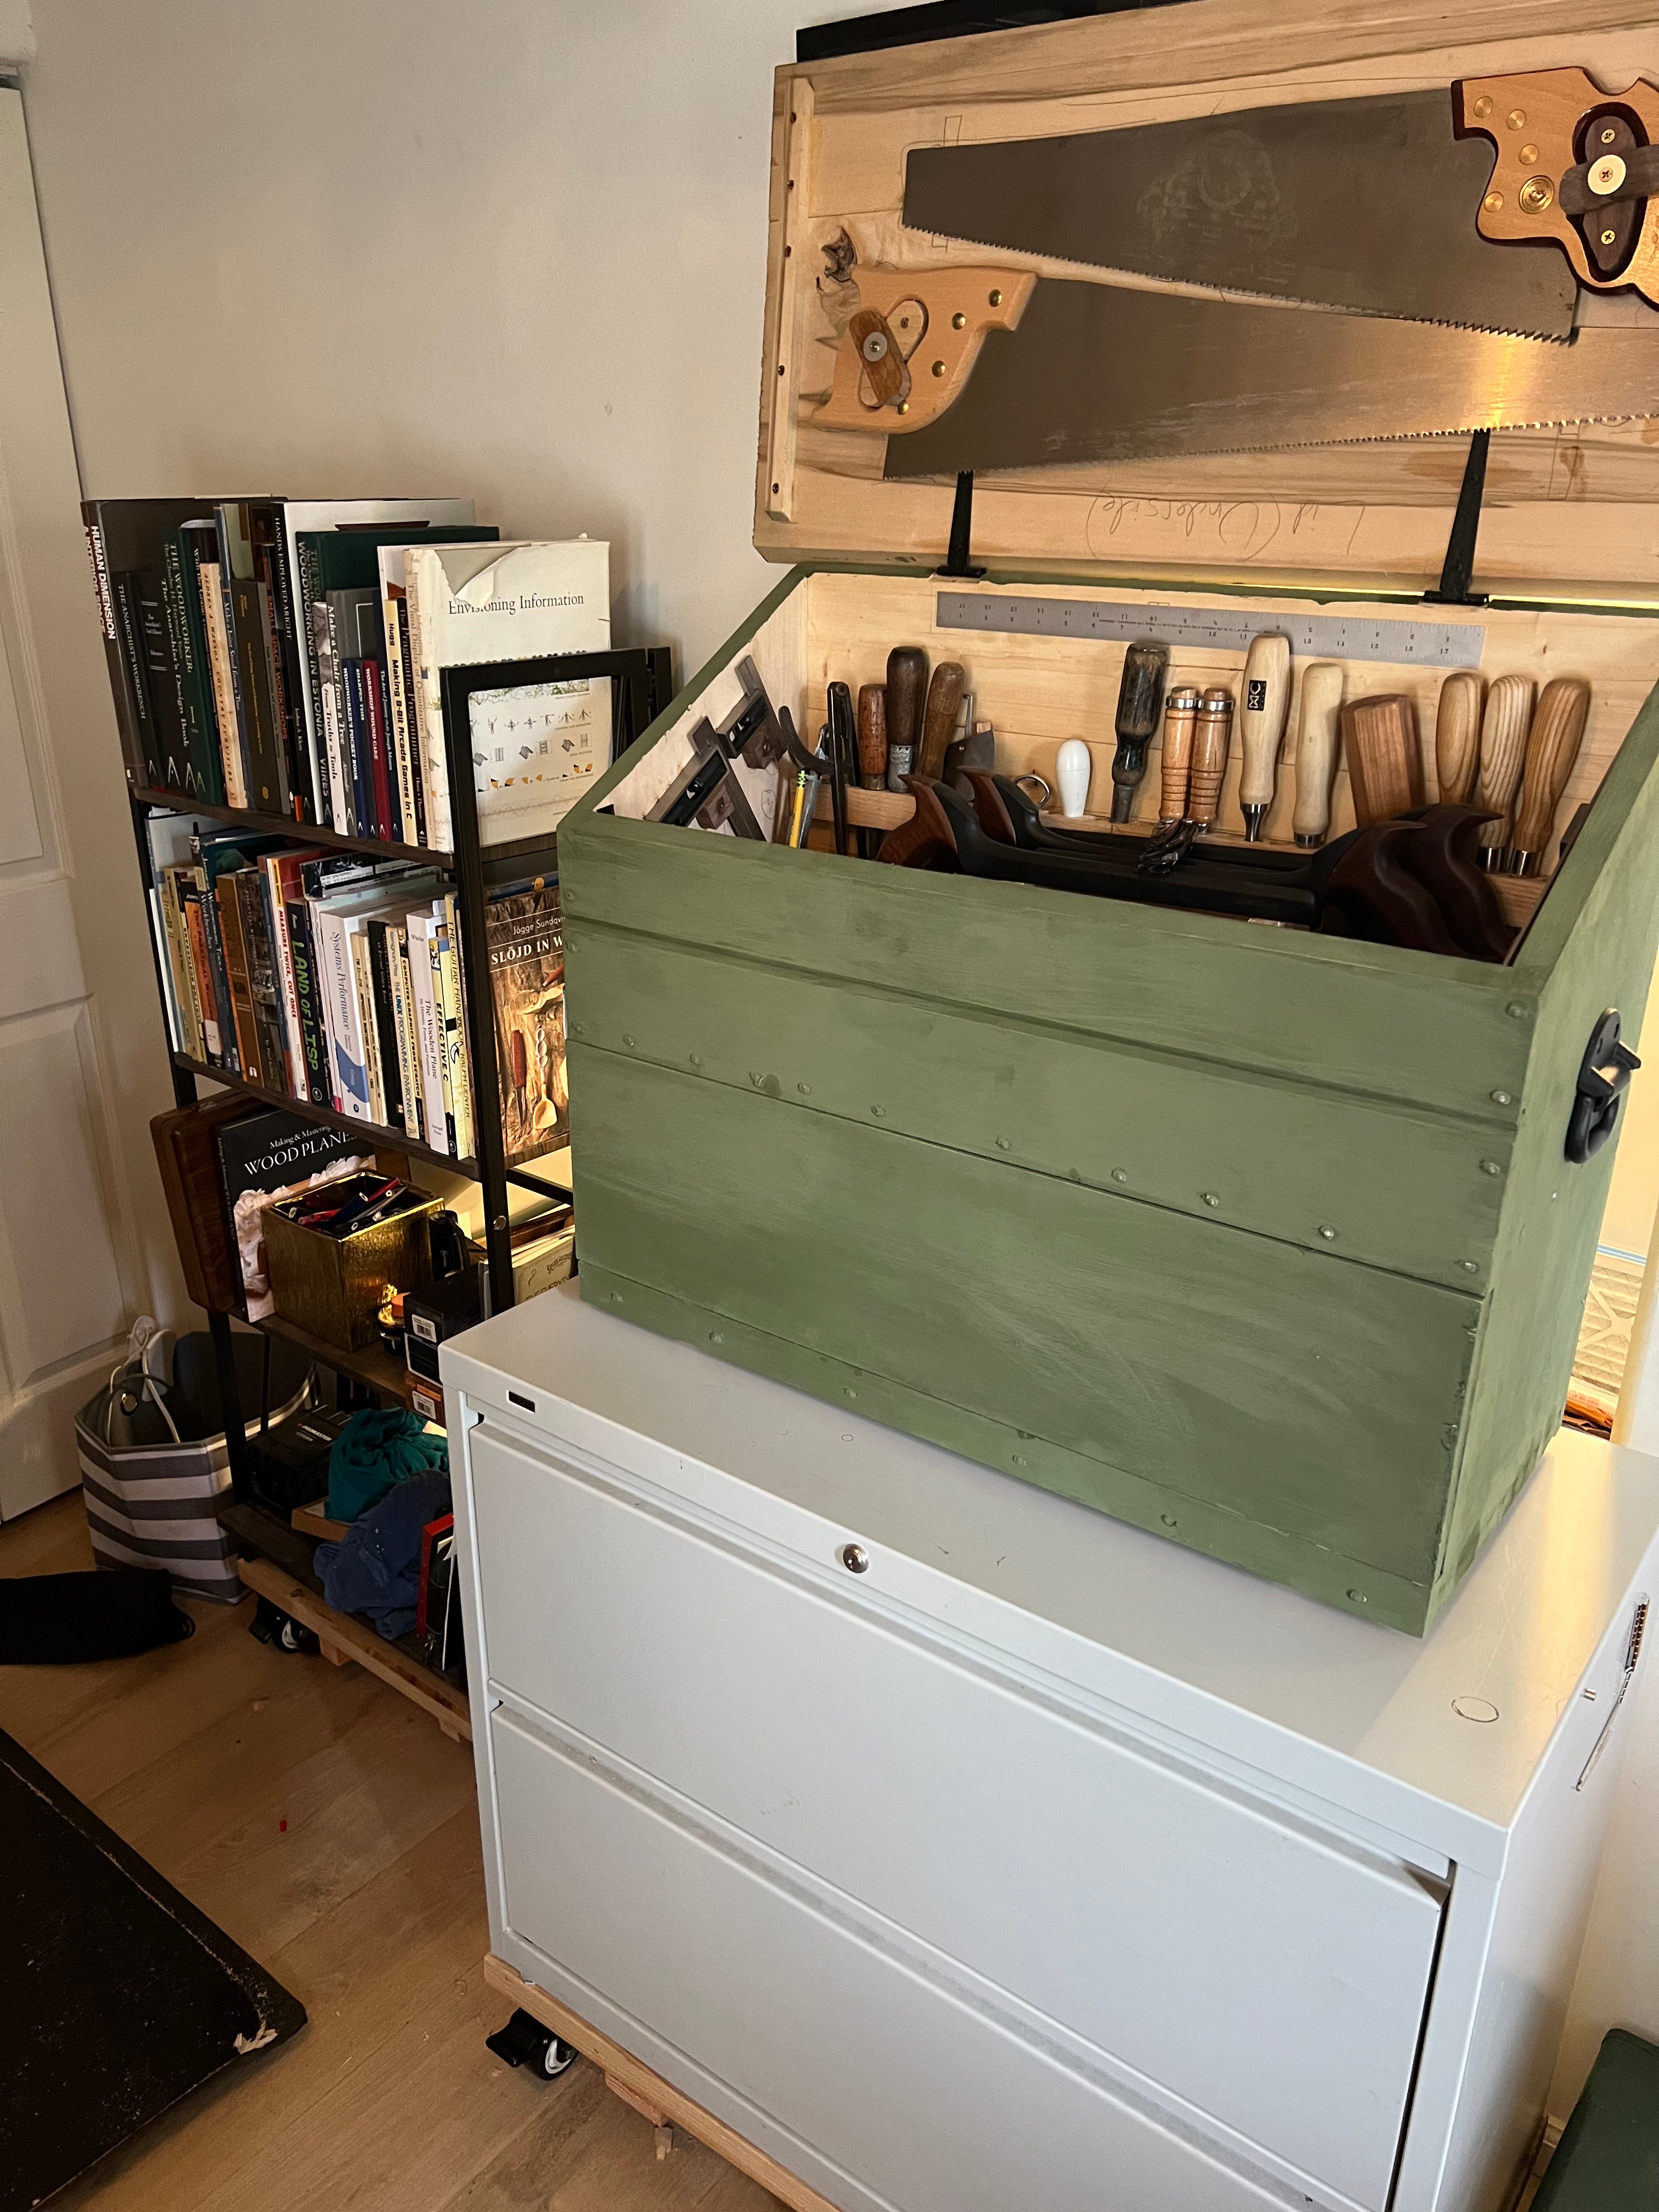
My toolchest is the first project I took on immediately after completion of my workbench. It was the first time I had a sturdy work surface, easy clamping, and a vise to work with. I followed Megan Fitzpatrick’s article in Fine Woodworking (available for free download as a PDF when I did the project) and went from there.

Rather than follow the exact measurements, I enlarged the plan for my toolchest by a few inches to make sure that I could fit my panel saws in the chest. This is a bit of a risk as this toolchest is designed to be portable, but I cannot imagine a world where I take hand planes somewhere but not a rip saw, so wider it is.
After deciding on the overall dimensions of the piece I drew up some plans and headed to the lumberyard. I was using Linden (aka Basswood) for this project, as it’s extremely lightweight and a toolchest full of steel tends to get heavy. I was blown away at how light it was. This is after spending a months using mostly Cherry and Maple. Unfortunately at the lumber yard I made a pretty stupid mistake. The width of the toolchest was defined to be 30” wide. My car can handle pieces that are at most 90” long. The pieces I bought were something like 110” long. I had the lumberyard remove 20” so that the piece would fit in the car, but now I had twenty inches of waste, plus a likely miss on one of the remaining pieces as you’re never gonna get a zero waste sawkerf (90” minus 1/8” means you only get two 30” pieces, not three.) If I had instead asked them to cut it closer to (but not at) the middle I likely would have ended up with far less waste. I made this same mistake with the rear of the chest, which is made out of tongue and groove pine.
Next I rough cut most of my work to size. I sawed out the floor, the two sides, the shelf in the middle, and the pieces for the top. I made the dovetails mostly with a couple joinery saws and chisels to remove the waste (I really don’t like using coping saws for that.) Next I had a new-to-me joint: a rabbet to hold the shelf. I did the whole thing with a crosscut joinery saw (14TPI) and excavated the waste with a chisel. I didn’t have a router plane so it was not quite perfect. I am ok with this but it did end up making the whole thing a little less square.


Much of this project is strengthened by some cut nails. I made a few mistakes here. First off I didn’t angle all the nails perfectly, so a few of them broke out of the piece they were driven into. Thankfully none are so bad that the piece is ruined, but there’s definite room for improvement here. Secondly, I put too many nails into the front of the toolchest. Often when doing woodworking I try to avoid being over-precise, but in this case it would have been worth walking off the spots for the nails with dividers, as the nails are right on front of the chest and the haphazard nails look pretty sketchy.


Because of my mistake at the lumberyard I ended up getting some tongue-and-groove stuff from my local hardware store for the back of the chest. This is actually called for by the design, I just didn’t expect to need it. But I did. I made the same mistake at the hardware store and ended up with just barely enough to complete the back.
One of the most fun parts of this toolchest is the fall front. I made the “lock” with a scrap of cherry that I planed to size. As per usual I made a mistake here too. In the lock the design calls for a round hole you can use to pull the lock out. When boring that hole I split the top of the lock pretty dramatically. I figured that maybe I could just use chisels and make a square hole, but this just ended up breaking the top off in the same area. If I were to do it again I would: test first with a different piece of cherry, and likely pre-drill a much smaller hole and clamp the piece side-to-side to keep it from splitting.
Fall front in action:
The next major piece was adding the lid. This was so tricky. I mentioned above that the back of the chest was just barely enough wood. The whole top of the chest is planed to an angle. Unfortunately because I was so low on tongue-and-groove pieces for the back that the top of the rear of the chest intersected with the tongue of a piece. This meant that the hinges for the chest are at a bizarre angle. On top of that there is a small gap between the lid and the rear of the chest.
Mounting the lid was really difficult; the chest had to lay on the floor and I had to carefully align the lid with the hinges using painters tape to keep everything aligned. If I were to do this again I’d try to do more tests. I did do some tests with some scrap and the hinges, but I oversimplified in my test and so the real-life version was harder than the test.


After all the casework was done it was time for the really fun part: creating a home for each of my tools! The first thing I did was make a rack for chisels and other long tools. I used some scrap oak and made as many holes as I was comfortable with using a nice woodowl auger bit. Since doing this task I have learned that using oak was probably a mistake, as it reacts with iron. I might try to replace it with Maple or something as it’s only screwed in place.
As with everything in this project I did everything by hand here, which meant hand-boring the pilot hole and counter sink, plus using a screw driver to drive the screw, rather than a power tool. At some point I wasn’t able to screw the screw any deeper despite the rack being a little wobbly. It’s ok, but I have since learned that while lubricating a screw with 3-in-one is good, it’s much better to lubricate a screw with actual furniture wax. I suspect if I had done that I would have been able to drive the screw all the way in.
I carefully expanded a few of the slots for wider chisels, but if I had it to do again I would have done this work before mounting it to the chest, as slightly expanding holes is hard and slow work.


Next I created the till for my joinery saws. My goal here was to hold all of my joinery saws at as low a profile as possible and to not take up too much space in the chest. I made the rack pretty short so that there would be airspace above the saws for tools to be on the lid, and had the rack as far to the right as was feasible, to allow putting larger tools to the left of the rack. This was immediately useful as up until this point my joinery saws (hundreds of dollars in saws!) were lying in a pile.
Next I created toggles to hold my panel saws on the underside of the lid. At this point I was firmly off the reservation, just making things I’d seen and coming up with my own plans. I outlined the inside of the handle of each saw on some scrap and roughly cut it to size with my panel saws. From there I used a rasp and a file to shape it till it would just fit in the saw handle. After that I made toggles of a similar size. The intention was that I be able to rotate the toggles and remove the saws, but rotate the toggles 90 degrees and the saws are safely kept in place.
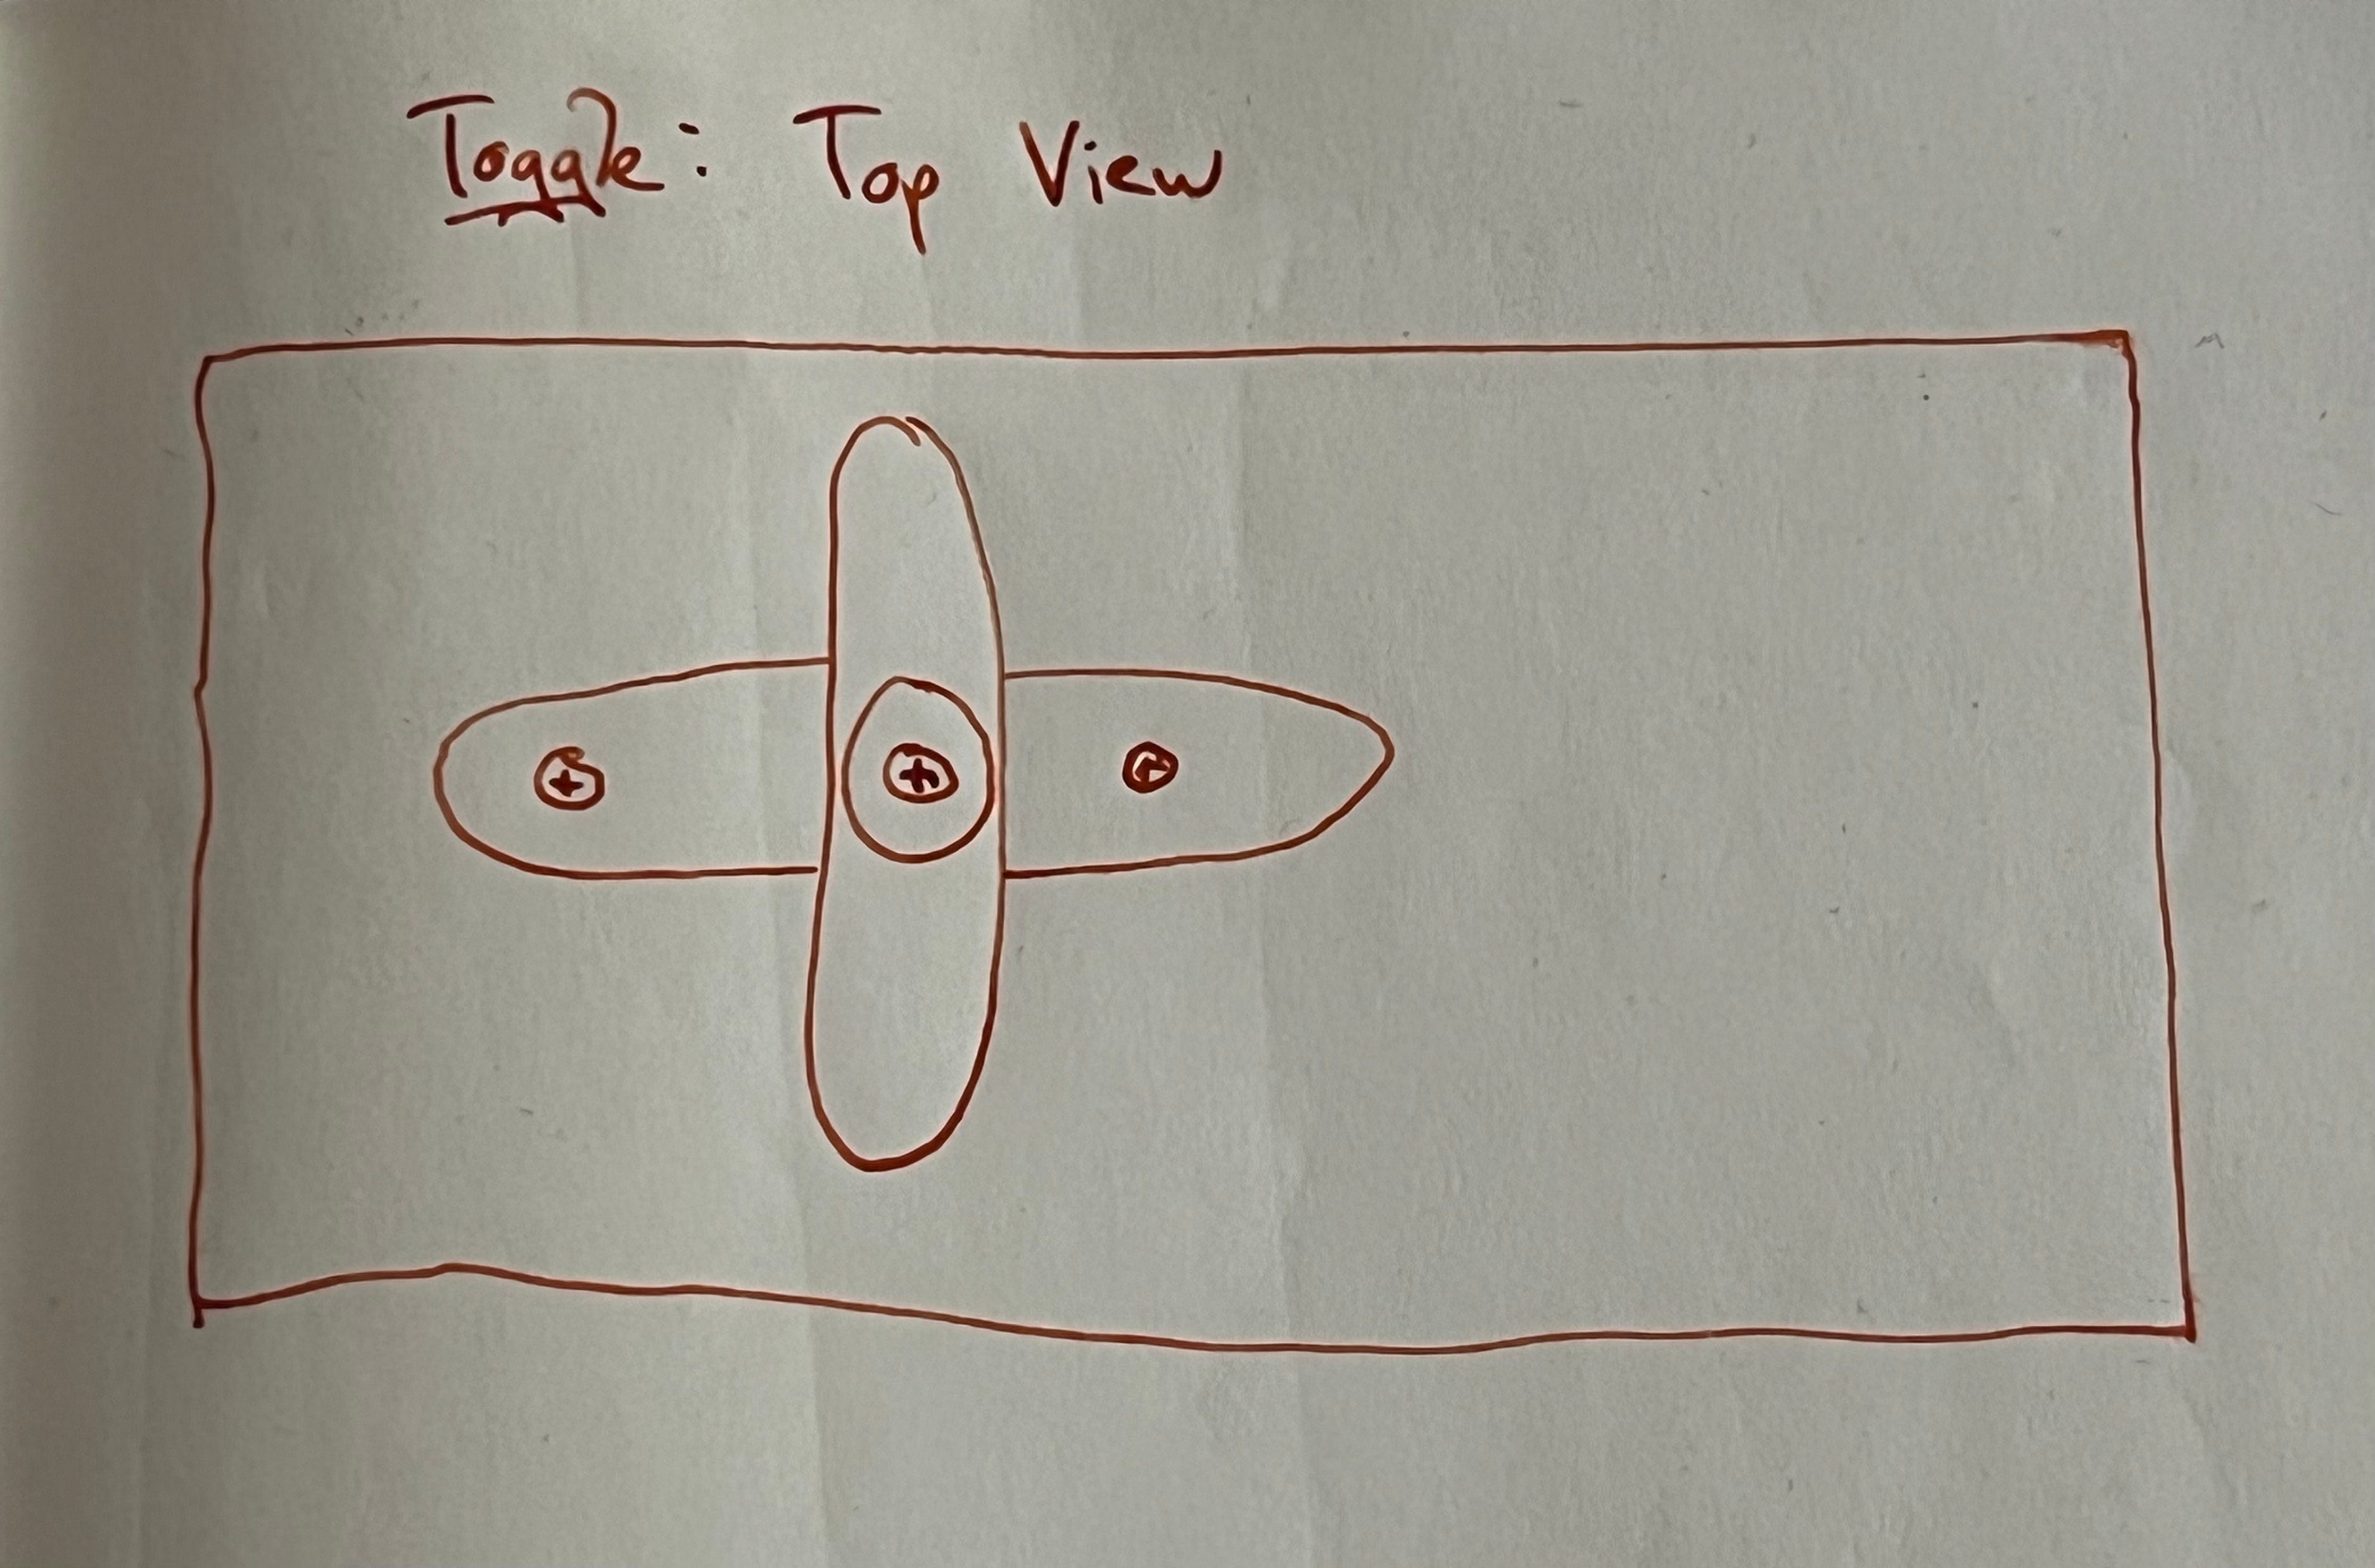
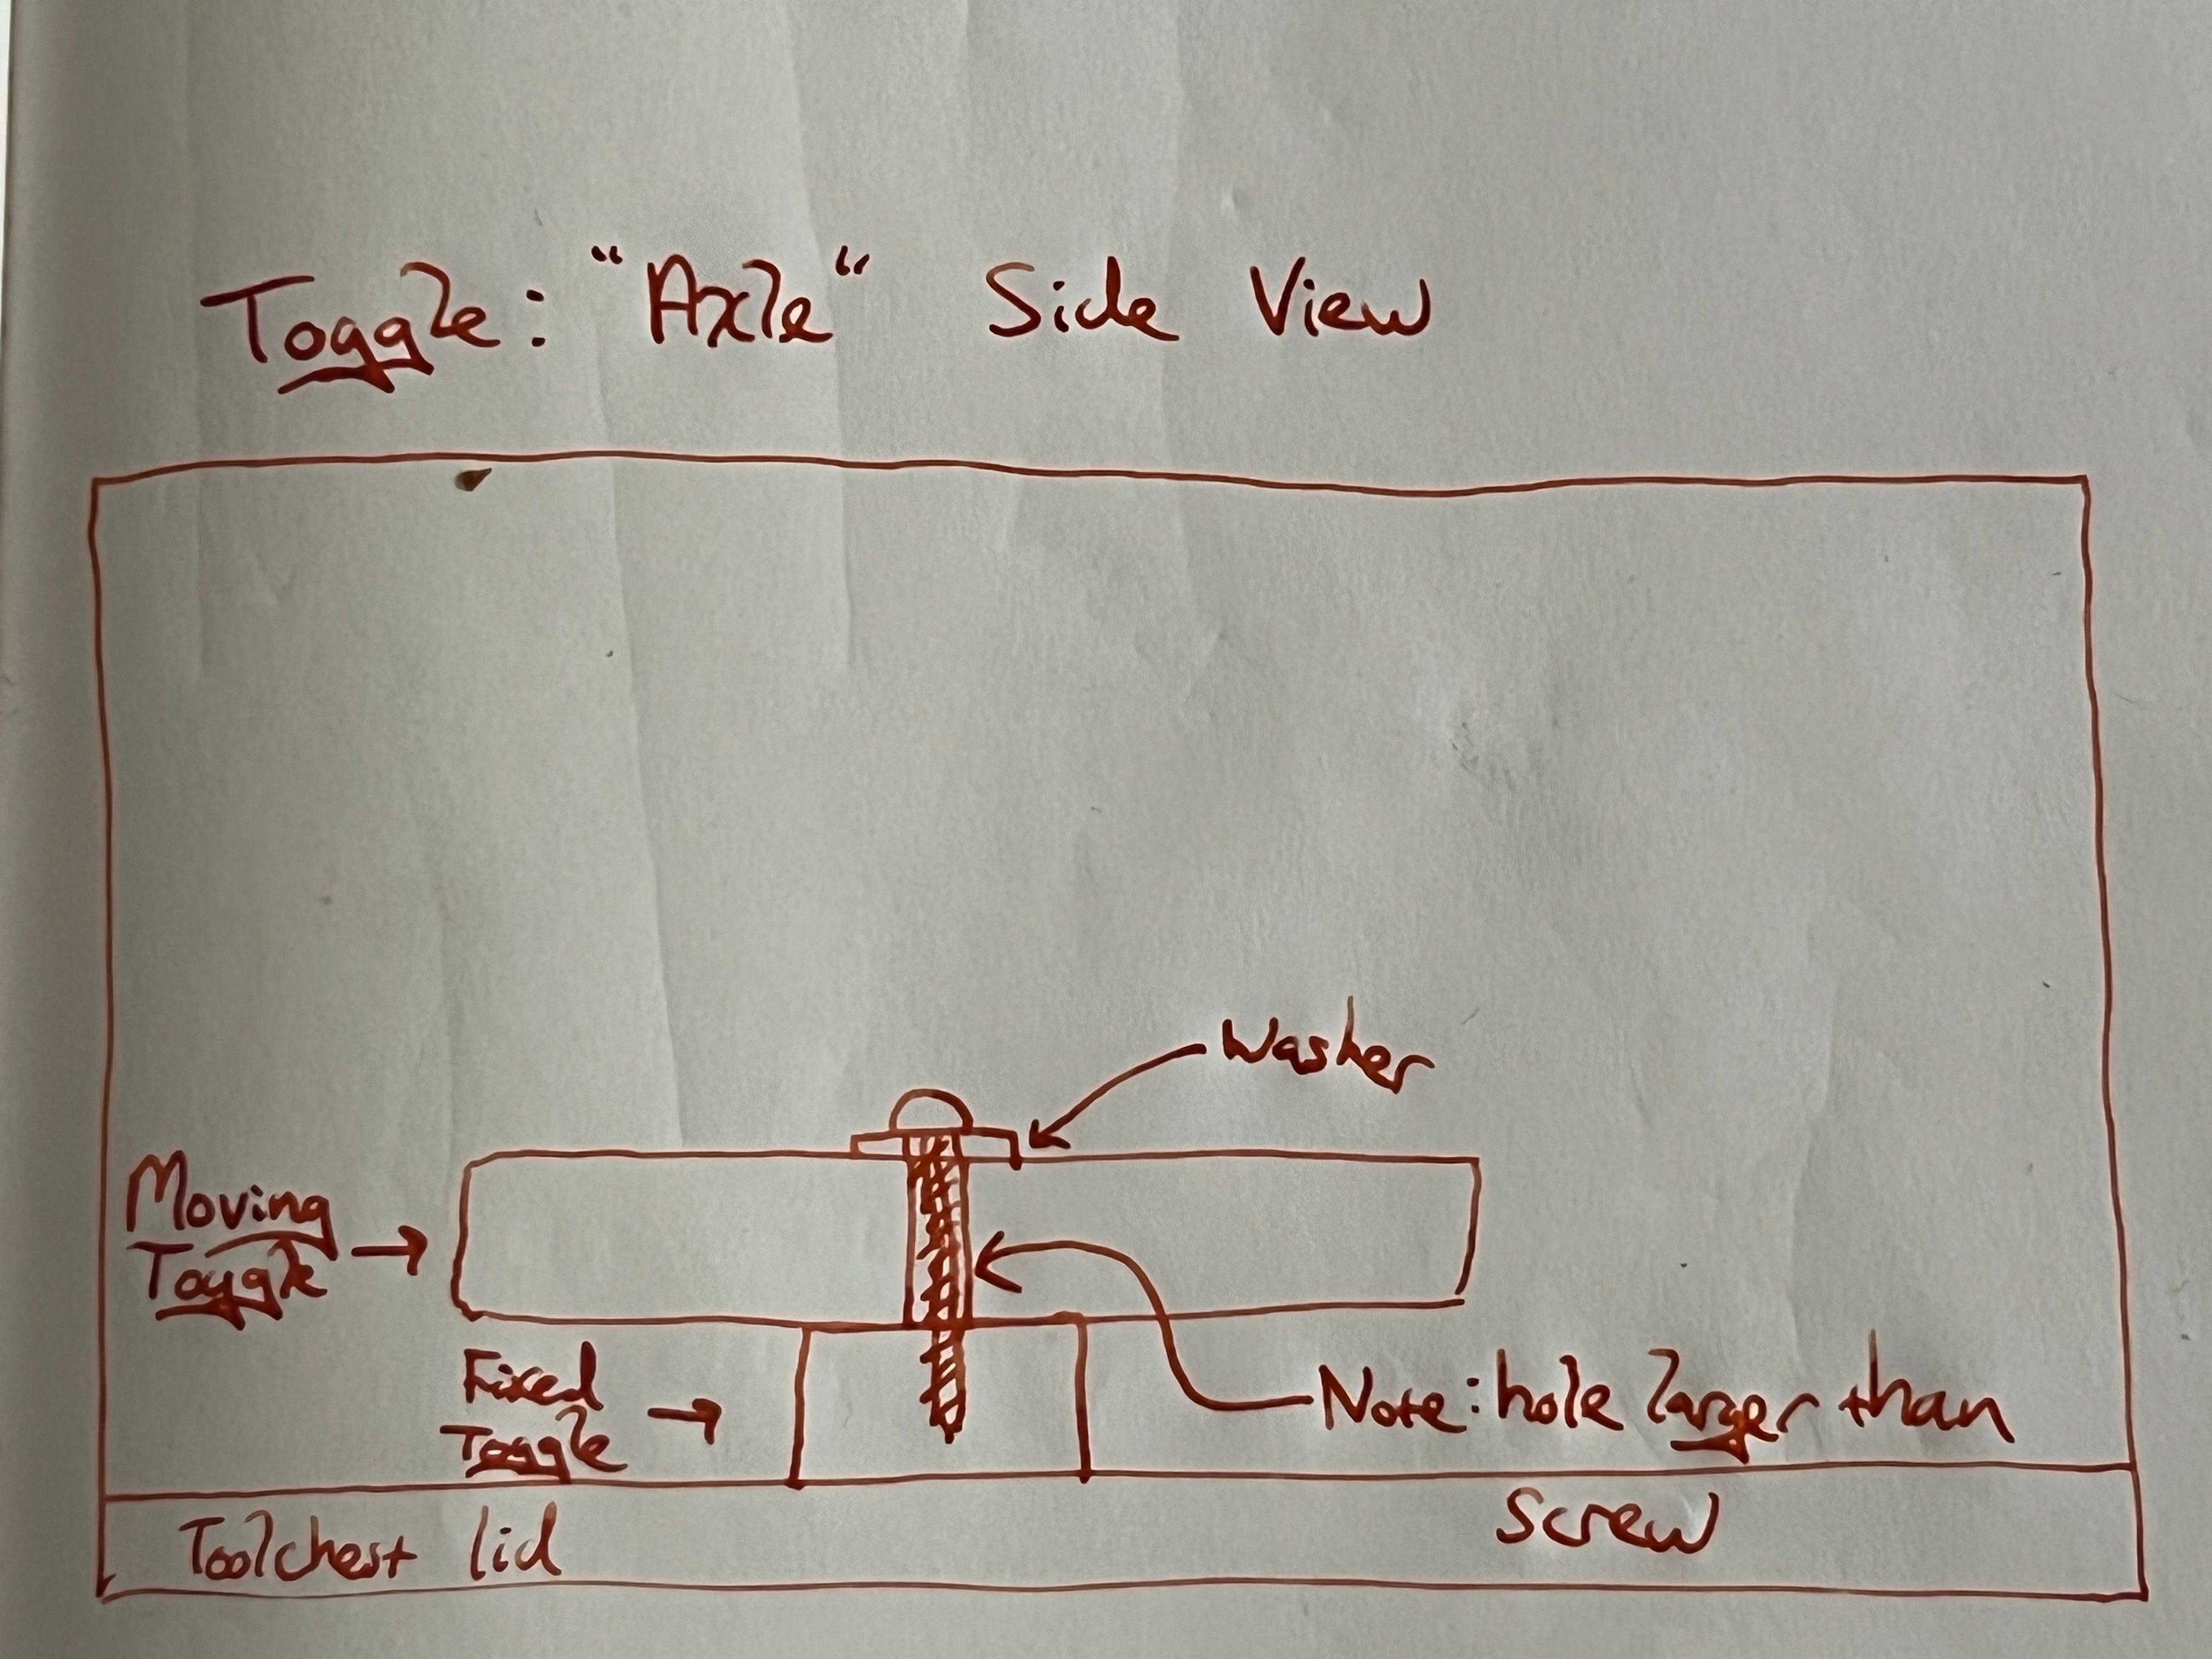
I am pleased with the way the toggles can rotate: I drilled holes through the toggles bigger than the screws (so the screws wouldn’t even engage with the toggles) and placed a washer beneath the screw. This way when the toggle spins the screw isn’t turning or chewing up any wood.
After this I painted the whole toolchest with some green milk paint. This was the first time I painted any of my shop stuff and the first time I used milk paint. The paint kinda smells and has a weird consistency, but the fact that it has zero VOCs makes it a great option for me. I maybe should have covered it with a layer of paste but that seemed like a hassle so I just left it.
Finally, I embedded magnets and some tiny racks in the walls of the chest. I ordered cylinders denominated in freedom units from Apex Magnets (no affiliation.) I initially tried some random ones I got on Amazon but they were pathetically weak. I embedded the cylinders by boring the appropriately sized hole and putting some epoxy in the holes before pushing in the cylinder. Finally I added little blocks under the triangles held up by magnets so that an earthquake wouldn’t make everything fall.


I still have yet to get around to making plane cubbies; I will definitely do that if I take this toolchest somewhere, including on a move, but for now I don’t need to. I know the underside portion of the chest is historically left open so that large things can fit down there but for me it is total chaos and I would like to figure out a strategy for organizing it better.
When I went to go get Axel out of our bedroom, I was planning to be nice dad, get him up, and then go join a big meeting that I had a major part in. I opened the door, and screamed like Michael Scott seeing the head of HR at what I saw:
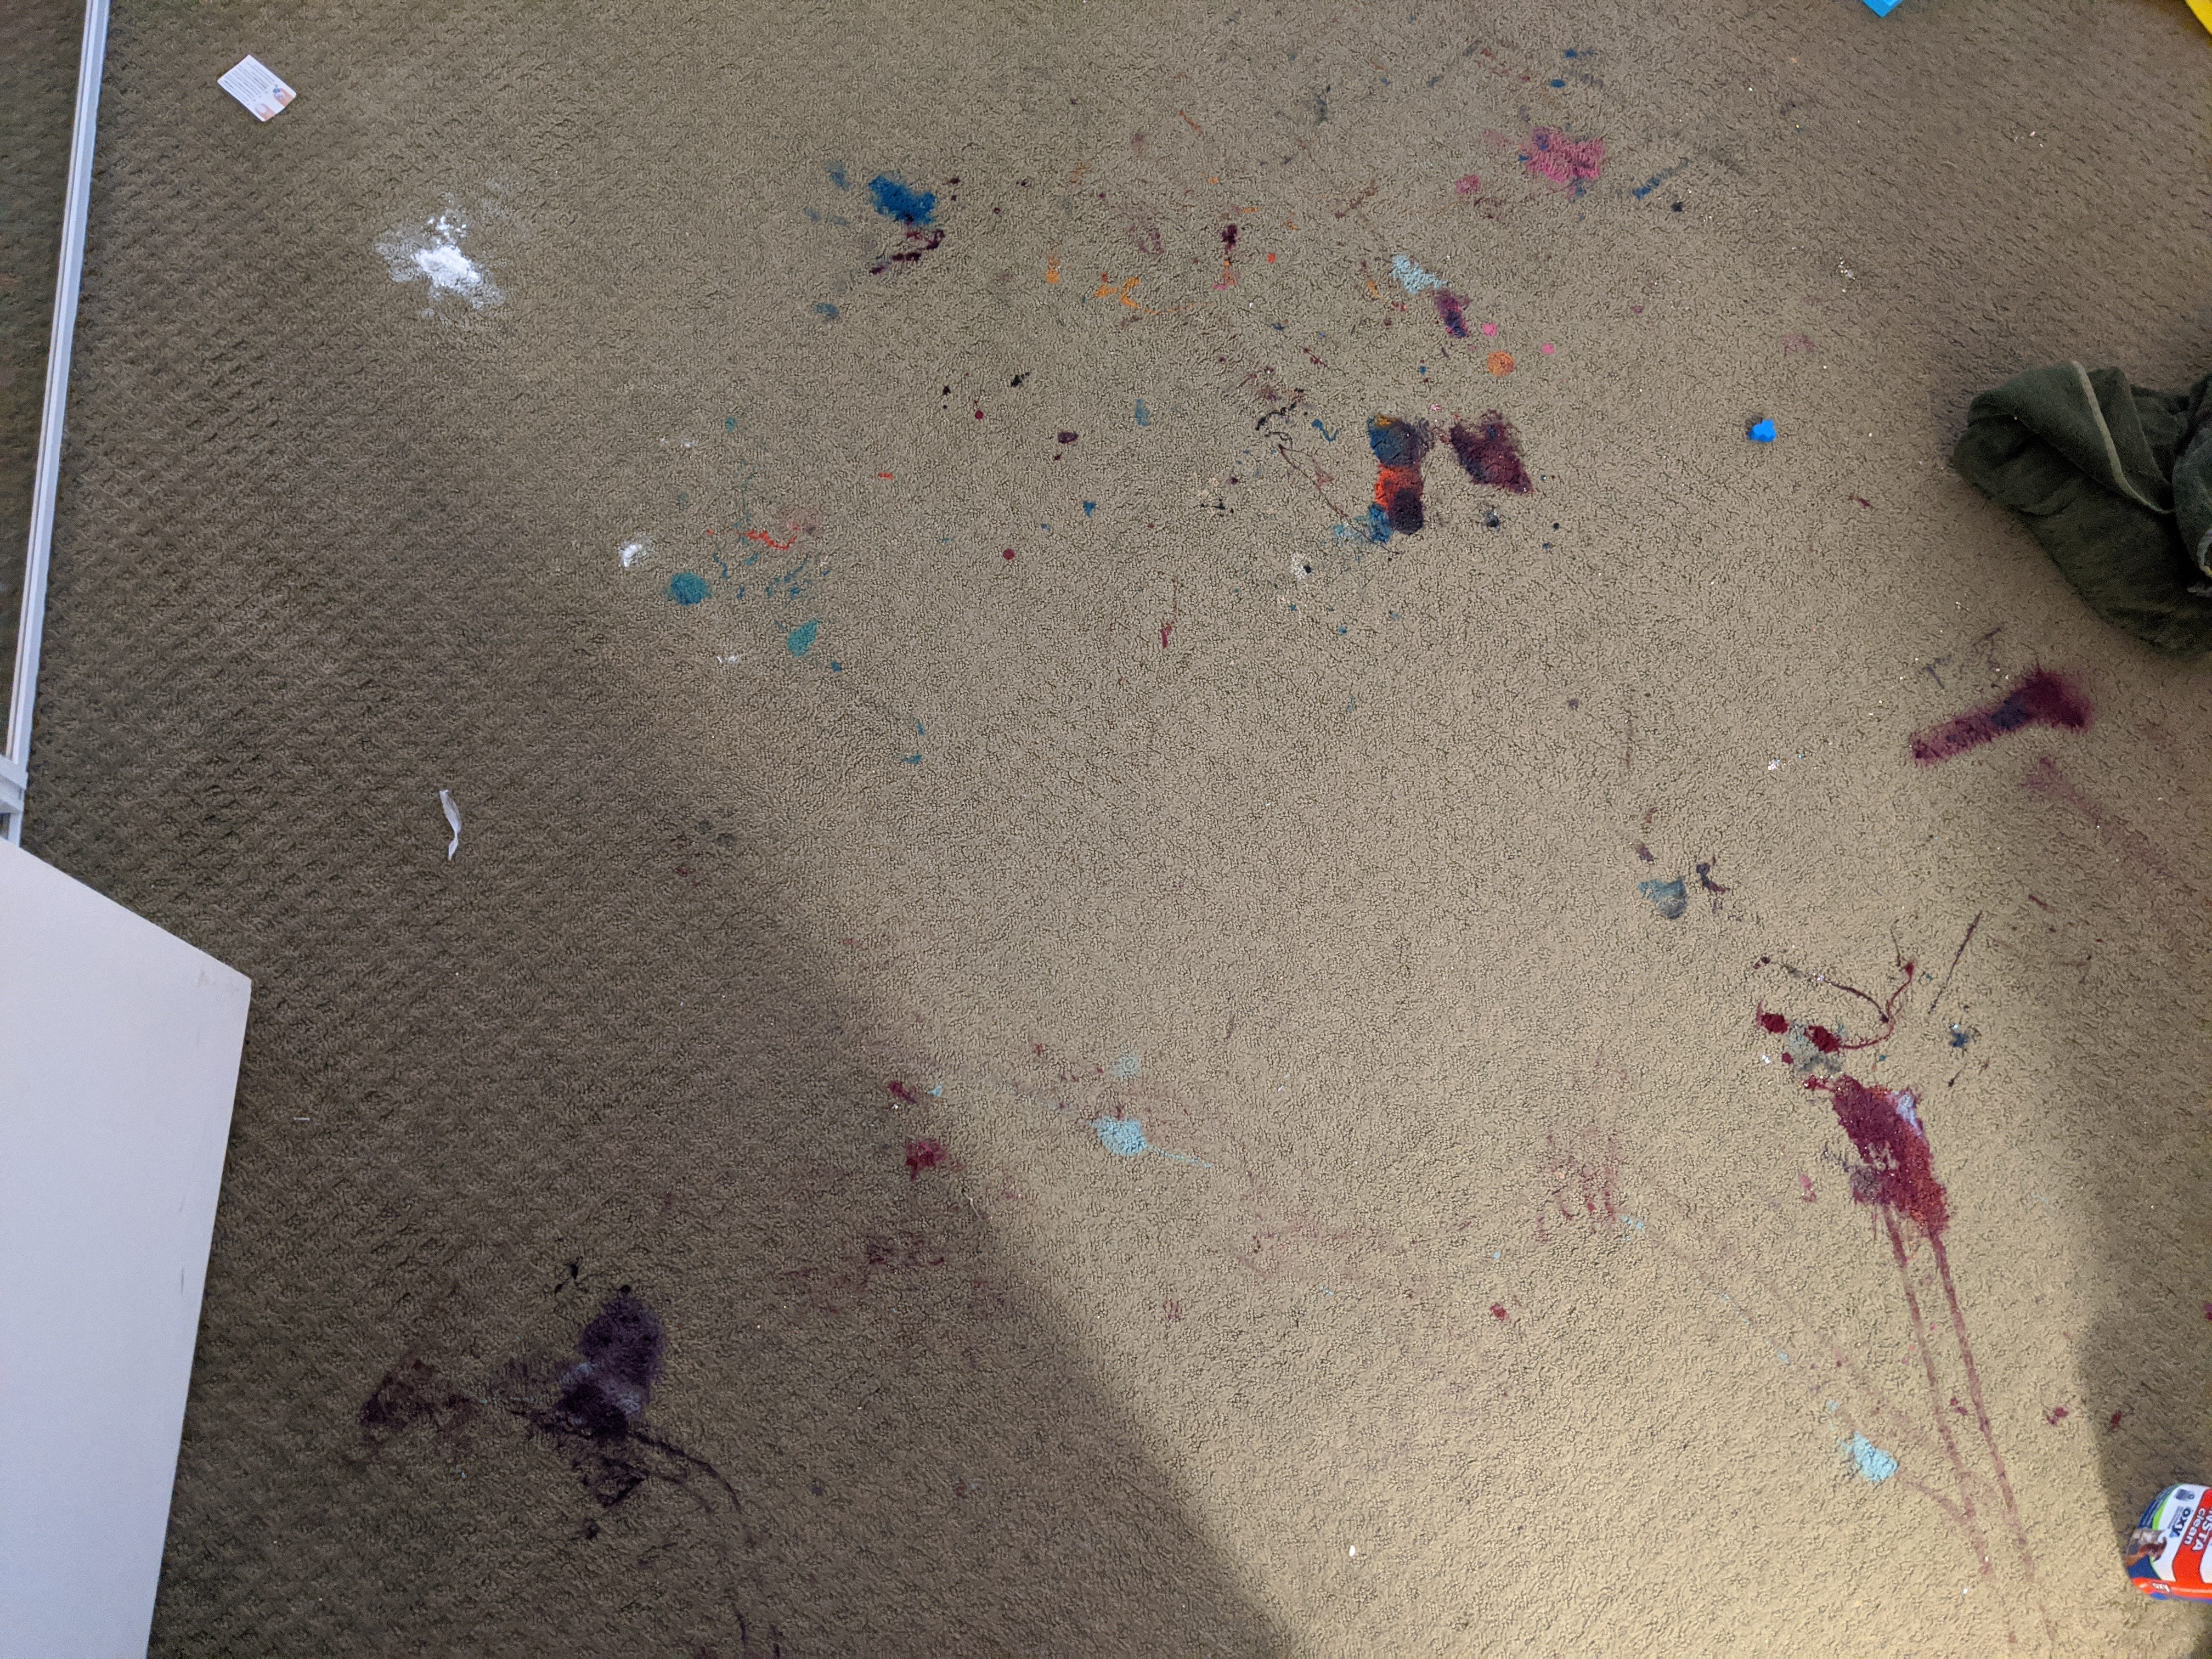
Axel had gotten into Cat’s nail polish, slowly acquired over the coarse of her adult life. He told us that he wanted his toy car to be a different color.

When this happened, the whole place smelled like nail polish. The floor of our bedroom became uncomfortably scratchy. I just wanted to go out to a restaurant and have a margarita and forget it for an hour, but thanks to the pandemic you couldn’t even go out to eat.

This Dutch tool chest is amazing! So cool that you built it! And w hand tools. That you made.